Appliance Types
- Air Conditioner
- Automobile
- Chainsaw
- Circular Saw
- Dishwasher
- Drills
- Dryer
- Drywall Screw Gun
- Furnace
- Gas Fireplace
- Gas Grill
- Gas Patio Heater
- Grinder
- Heat Pump
- Impact Driver
- Impact Wrench
- Microwave
- Nailer
- Orbital Sander
- Pool Heaters
- Powerwall
- Range
- Refrigerator
- Television
- Washer
- Water Heater
Appliance Brands
- A.O. Smith
- AccuCold
- Admiral Craft
- AGA
- Airrex
- Amana
- Ambiance
- American Range
- American Standard
- American Water Heaters
- Aquacal
- Armstrong
- Asko
- Avanti
- Avenlur
- Azure
- Beko
- Bellfires
- Bertazzoni
- Blackstone
- Blaze
- Blomberg
- BlueStar
- Bosch
- Bradford White
- Bromic
- Bryant
- Cafe
- Calcana
- Capital
- Carrier
- Char-Broil
- Char-Griller
- Chrysler
- Coates
- Coleman
- Comfortmaker
- Commercial Chef
- Continental
- Cosmo
- Cove
- Crown Verity
- Dacor
- Daikin
- Danby
- Danfoss
- DaVinci
- DCS
- Deco
- DeWALT
- Ducane
- Dyna-Glo
- Dyson
- EcoSmart
- Electrolux
- Element4
- Empava
- Equator
- Eurodib
- European Home
- Everdure
- Farberware
- Fhiaba
- FibroPool
- Fire Sense
- Fisher
- FiveStar
- Flare
- Flash Furniture
- Focus
- Ford
- Forno
- Forte
- Frigidaire
- Fulgor Milano
- Gaggenau
- GE
- General Motors
- GlowBrand
- Goodman
- Grundig
- GSW
- Haier
- Hayward
- Heatstar
- Heil
- Hestan
- Hisense
- Hitachi
- Hotpoint
- iio
- Ilve
- Impecca
- Ingignia
- Insignia
- JennAir
- John Wood
- Keeprite
- Kenmore
- Kenyon
- KitchenAid
- Kucht
- La Cornue
- Lennox
- LG
- Liebherr
- Lifetime
- Lion
- Luxaire
- Lynx
- Magic Chef
- Marvel
- Maytag
- McQuay
- MicroFridge
- Midea
- Miele
- Migali
- Monogram
- Montigo
- Mr Heater
- Napoleon
- Navien
- Nexgrill
- Noritz
- Panasonic
- Patio Comforts
- Payne
- Pentair
- Perlick
- PITT
- Premier
- Raypak
- Real Fyre
- Regency
- Reliance
- Rheem
- Rinnai
- Roma
- Ruud
- Saber
- Samsung
- Schwank
- Sharp
- Smeg
- Solas
- Sony
- Spartherm
- Speed Queen
- StaRite
- State Water Heaters
- Stiebel Eltron
- SubZero
- Summerset
- Summit
- SunGlo
- SunPak
- Sunpentown
- SunStar
- Superiore
- Takagi
- TCL
- TEC
- Tempstar
- Tesla
- Thermador
- Thor Kitchen
- Toshiba
- Town and Country
- Toyota
- Traeger
- Trane
- Twin Eagles
- U-Line
- Unique
- Vaillant Group
- Valor
- Verona
- Victory
- Viessmann
- Viking
- Vizio
- Weber
- Westinghouse
- Whirlpool
- Whynter
- York
- ZLINE
Article Categories
- Air Conditioners
- Appliance Care
- Appliance News
- Dishwasher News
- Drying Machines
- Furnaces
- Gas Fireplaces
- Microwaves
- Pool Heaters
- Refrigerators
- Stoves - Ranges
- Tips and Tricks
- Washing Machines
- Water Heaters
More Articles
How can I properly reattach this? (Dryer motor)
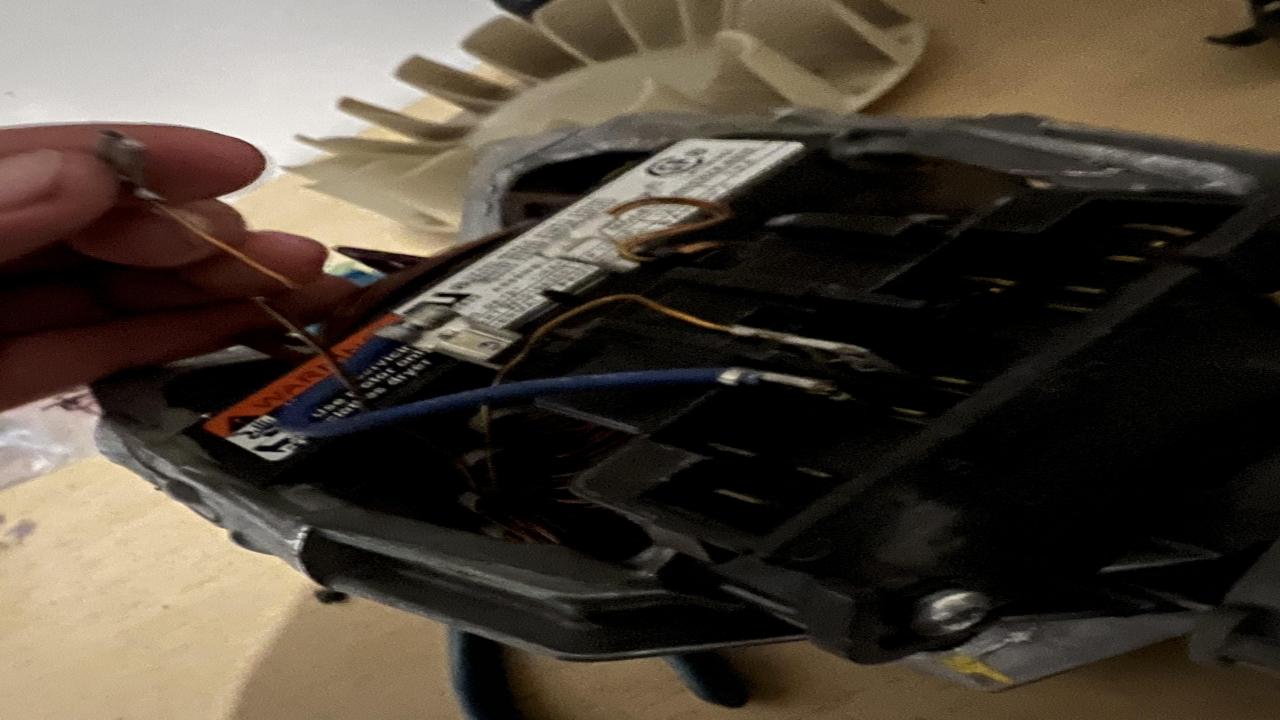
Reattaching a dryer motor can vary depending on the specific make and model of the dryer. However, here is a general guide to reattach a dryer motor:
-
Safety first: Before working on any electrical appliance, ensure that it is unplugged or the circuit breaker is turned off to avoid the risk of electric shock.
-
Access the motor: Remove the dryer's back panel or front panel, depending on the design, to gain access to the motor. Consult the dryer's user manual or manufacturer's instructions for specific guidance on how to access the motor.
-
Disconnect the motor: Identify the wiring connections attached to the motor. Take note of their locations or take pictures for reference. Carefully disconnect any electrical wires or connectors connected to the motor. Remember the sequence of the connections to ensure correct reattachment later.
-
Remove the belt: If the motor is connected to a belt that drives the drum, detach the belt from the motor pulley. Refer to the user manual for instructions on how to release tension or remove the belt.
-
Unmount the motor: Locate the motor mounting bracket or assembly. It typically holds the motor in place. Loosen the mounting screws or bolts that secure the motor to the bracket or the dryer frame. Depending on the dryer design, you may need to remove additional components, such as a blower wheel, to access the motor mounting.
-
Remove the motor: Once the motor is free from its mounting, carefully lift it out of the dryer. Take note of any positioning or alignment tabs or marks that indicate the correct orientation of the motor.
-
Reattach the motor: Place the motor back into its designated position in the dryer. Ensure it aligns properly with any tabs or marks that indicate the correct orientation.
-
Secure the motor: Use the mounting screws or bolts to fasten the motor securely to the mounting bracket or the dryer frame. Ensure the motor is stable and properly aligned.
-
Reconnect wiring: Referencing the notes or pictures taken earlier, reconnect the electrical wires or connectors to the motor in the correct sequence. Ensure they are firmly attached and secure.
-
Reinstall the belt: If you removed the belt, follow the dryer's manual instructions to reinstall it properly onto the motor pulley and the drum. Ensure the belt is correctly tensioned.
-
Test the dryer: Before closing the dryer panel, plug in the dryer or turn on the circuit breaker. Test the dryer's functionality by running a short cycle. Observe the motor's operation and listen for any unusual noises or issues.
If you encounter any difficulties or are unsure about the process, it is recommended to consult the dryer's user manual or contact a professional appliance technician for assistance.
Hack the normal 2022 Beko launches event to create a positive impact on people and the planet

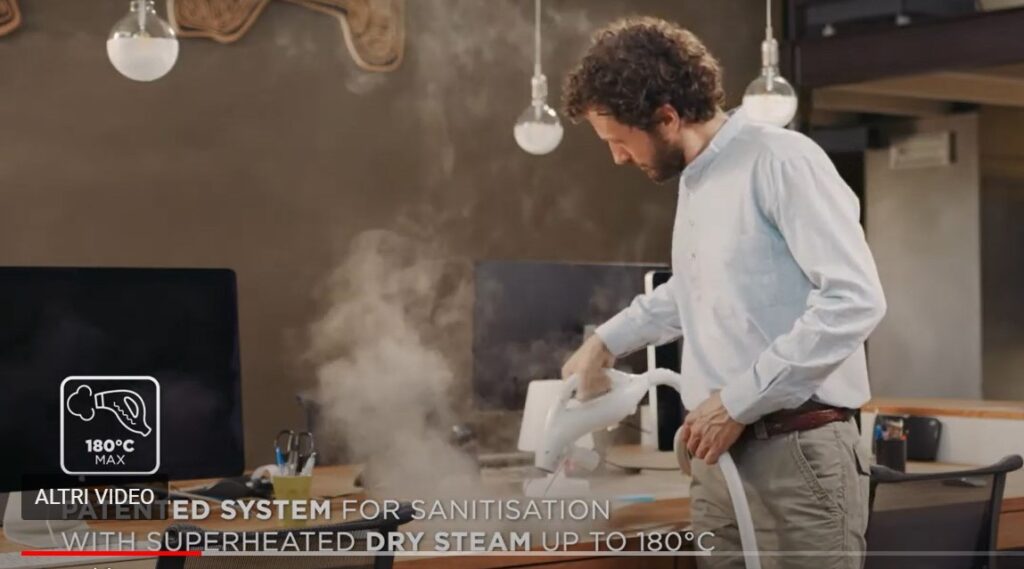
Polti Sani System tested in killing up to 99.999 of microorganisms


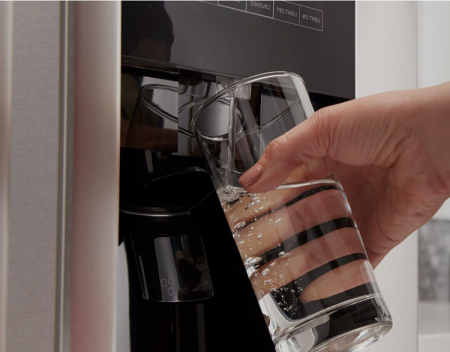
Refrigerator Water and Ice Dispenser Issues
Brava’s V3 Software Update Enhances Accessibility

Dacor Unveils New Undercounter Collection At Exclusive NYC Event